 |
|
The File Browser |
|
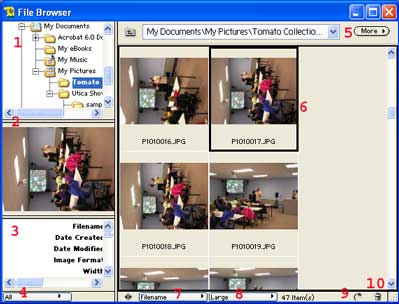
| During the first two workshops that I held on Photoshop Elements, I didn't spend a lot of time on the File Browser. In fact, I didn't have anything about it in the documentation I created. Since then I have explored it more and found it to be an excellent tool for organizing, moving, renaming and selecting your images. Below is an image of the File Browser. On the right, I have identified the major areas and tools in the File Browser. | ||
 You can resize any area within the File Browser by clicking on the frame of the section and dragging it to the desired size. |
1. Directory of your computer. 2. Preview of the image you have selected. 3. Information on the selected image. 4. Type of data shown in number 3. 5. File Browser Menu. 6. Thumbnails of images in the selected directory. 7. How the images are sorted. 8. Size of thumbnail images. 9. Rotation button. 10. Trash Can for deleting images. |
|
| Displaying the File Browser: You can display the File Browser by choosing it from the welcome window or going to the File Menu and choosing Browse.
Opening a File: In the upper left hand corner the contents of your computer and network drives are displayed. Use this window to navigate to the folder or drive where your images are stored. You can open the file by: double clicking on the image; selecting the file and pressing the enter or return key; Rotating Images: You can us File Browser to rotate images for viewing. The select the image you wish to rotate by clicking on it. Then click on the rotation button shown next to number 9 above. You can rotate an image counter clockwise by holding down the Alt-clicking the image. Mac use Option-click. The image will be opened with the rotation you applied. It will not permanently be rotated until you save the image. Renaming Images or Folder: In the right had panel click on the name of an image or a folder. You can then type in a new name for the image. |
||
Renaming all of the Images in a Folder: When you use a digital camera the images will be numbered. The numbers don't help you to identify the subject or date the image was taken. You can use Batch Rename to give your images a name that will help you locate the image as well as know the subject of the images without opening them. You can do just a few images or hundreds at one time. First select the images you wish to rename. If you want to rename all the images in a folder make sure none of the images are selected. Control D/Command D will deselect all files. Choose the File Browser Menu shown at right by clicking on the More Button shown next to number 5. The dialogue box shown below will appear.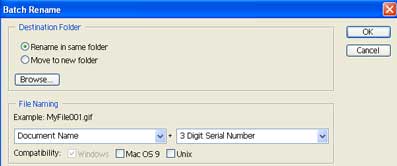
Choose whether you want to keep them in the same folder or move them to a new folder. If you are moving them to a new folder, use the browse button to select the folder. The most important part is the File Naming area. Where it says Document name type in the name you want to appear on each image. Example: If I took a field trip to the zoo I might call these images Zoo_Trip_June_2003. This way I can search for them by zoo or June or 2003. Note: I use underscores because I often publish images to the web and I don't want spaces in the names. Next choose the second part of the name. This is usually a number. Tip: If the last name in your first box is a number put an underscore after it so the date and the number will be separated. In my example the result would look like this Zoo_Trip_June_2003_001. Picture Information (3 Above): This area gives you information about your image. Your choices are All or EXIF. EXIF data is information from your camera. If you have a newer camera this might include the speed and aperture settings. This information can help you determine what settings work best in different situations. View Menus (7 & 8 Above): These two items let you determine how the files are sorted and the size of the thumbnails. You can show the EXIF data with the images using 8 above. Trash (10 Above): You can delete images by dragging an image to the trash or selecting it and pressing the Delete Key. |
 Tips -This menu can be viewed by clicking on the "More" button at number 5 above. -You can put the File Brower in the Palette Well by choosing "Dock to Palette Well" from this menu. -Using the Reveal Location in Explorer will take you to the File on your system. -You can add folders to your system by choosing new folder. Tip: Select the location for the folder in the upper left window before you choose New Folder. -The double triangles located to the far left of number 7 can be used to close the left panel and just show the thumbnails. -You can move an image to a new folder by clicking on the image and dragging it to a different folder. |
|
If you don't have Photoshop Elements, the next best thing is Picassa. Picassa is a great free program from Google.