Using Print Layouts

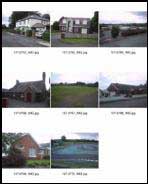
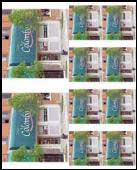
Photoshop Elements allows you to automate some actions. Two of these handy features are found under Print Layouts. Using Print Layouts you can create Contact Sheets or Picture Packages. These can be handy for reviewing pictures or saving money on good photo paper by printing multiple copies on the same page.

Shown on the left below is a Contact Sheet on the right is a Picture Package.

Contact Sheet
Picture Package

A contact sheet will print multiple images on the same sheet. You can set the number of columns and rows. You might want to print a contact sheet to determine which are the best images and which ones you want to spend time editing and printing. A Picture Package is much like what you get when you buy school pictures.
 
To create one of these choose Print Layout from the File Menu and then choose Contact Sheet or Picture Package.
 
Notes:
 
Contact Sheets

  1. Contact sheets will print the file name below the image.
  2. You Must select the Source Folder. (Before you choose this option make sure all of the images you want to use are in the same folder.)
  3. Choose the resolution. You should determine this based on your printer.
  4. Set the number of rows and columns.

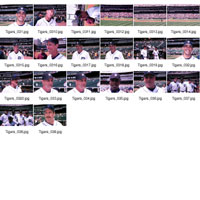
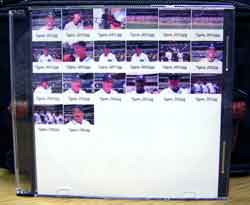
Using Contact Sheets

You can use contact sheets to create CD covers for images you are storing. This will help you locate files you have stored on the CD. See the sample below. Set your document size to 4.75 inches by 4.75 inches. In my sample, I used six rows and six columns. That is the size of a CD Cover. Choose your images and set the resolution to 72. This will create a smaller image size. Remember, you can have an outside, inside and back cover to the CD. Also, set the font size down to 6 or 8 pts. If you leave it at 12 pts. your type will be larger than your images.

Above is the contact sheet before it was printed.


This is the contact sheet insice the CD jewel case.

Tip to help you in cutting out the cover. From the File Menu, choose Print Preview. In the lower left hand corner, choose more options. Click on Corner Crop Marks or Border and add a 1 pixel border. This will help you trim your insert.

Picture Package

  1. I always do one image at a time. If you choose a folder as your source you will create a picture package for every picture in the folder. This can take a long time.
  2. Choose your image, Set paper size, resolution, and most importantly your layout.
  3. Layout determines how many and the size of the images on the page.
  4. Warning: adding text to the images will add it on the picture not as a caption.
  5. You can save the pages for use in the future.
Google
 

If you don't have Photoshop Elements, the next best thing is Picassa. Picassa is a great free program from Google.

| Home | Getting Started | Quick Fix | Images | Shapes | Text | Cropping | Vignettes |
| Animations | Print Layouts | Slide Show | Photo Gallery | Rollovers |
| Books | Web Sites | Classrom Ideas | Documentation | Buying a Digital Camera | About this Site |

These materials were created by Jim Wenzloff. You are welcome to reproduce them for educational purposes providing you include my name and the web address of the page. If you have any questions please contact .