Using Shapes and Effects

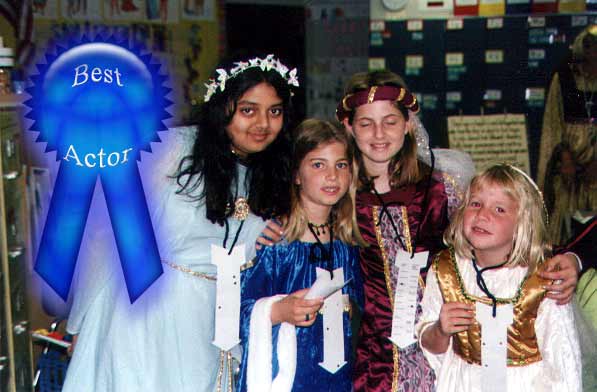
We are going to add an award ribbon to a photograph using the Shapes Tool. A sample is shown below. Also see "Creating Vignettes using the Custom Shape Tool." )


The above photo is availible from pics4learning.com at http://pics4learning.com/details.php?img=costu36685.jpg

Steps:

  1. Create a new image that is 597 pixels wide by 392 pixels high. (Those are the dimension of the photograph and will let us create a ribbon that will fit the area. Make the background transparent by clicking transparent under Content.
  2. Next using the Shapes Options Menu shown below choose the Ribbon from the Banners and Awards shapes. You access these using the small triangle indicated by the red arrow. 
  3. Draw a ribbon that fits in a quarter or less of the image size. See the sample above.
  4. Drag the Layers Style Palette from the Palette Well.
  5. From the pull down menu choose Wow Plastic. (Shown at Right)
  6. Next select the Text Tool and insert your desired text. You may need to use multiple layers.
  7. Use the Warp Text Tool to curve your text.
  8. From the Layers Style Palette you may choose to bevel, add a drop shadow, or glow to your text.
  9. We now have at least two or more layers to our ribbon. Save the ribbon so we can edit it if needed.
  10. From the Layer Menu choose Merge Visible. Use Save as in the File Menu to save this under a new name.
  11. Open the file kids_play.jpg.
  12. Edit the image so it is brighter and more vivid.
  13. Using the Move Tool drag the ribbon from the ribbon window onto the picture of the students.
  14. Move the ribbon to place it where you want it
  15. Use Save As to save your image with a new name.
Google
 

If you don't have Photoshop Elements, the next best thing is Picassa. Picassa is a great free program from Google.

| Home | Getting Started | Quick Fix | Images | Shapes | Text | Cropping | Vignettes |
| Animations | Print Layouts | Slide Show | Photo Gallery | Rollovers |
| Books | Web Sites | Classrom Ideas | Documentation | Buying a Digital Camera | About this Site |

These materials were created by Jim Wenzloff. You are welcome to reproduce them for educational purposes providing you include my name and the web address of the page. If you have any questions please contact .