Creating a Web Photo Gallery

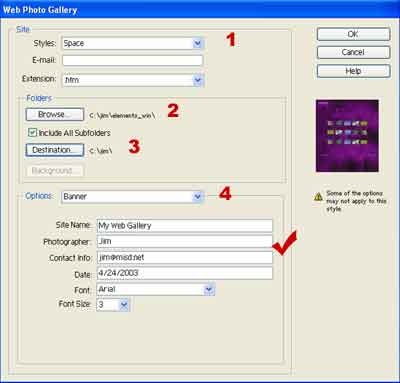
To create a web photo gallery without Photoshop Elements would take a long time. You would need to resize all of the images and then create numerous web pages. Elements does a lot of this work for you.
 
Steps:

Preparation: Before you begin you need to have all of your images in one folder. You also need to create a new folder where you will store your gallery.

  1. From the File Menu choose Create Web Photo Gallery
  2. Use the Web Photo Gallery Window as a reference.


Step One: Choose the style for your gallery.
 
Step Two: Choose the source folder containing your images.
 
Step Three: Choose the destination folder where you want to save your gallery.
 
Step Four: This step is optional. Using the pull down menu you can set:

Optional: You can fill in the Site name, photographer, etc. if you want the information to appear in the gallery.

  • The size of the Large Images
  • The size of the Thumbnails
  • Choose Custom Colors for web pages (The templates will have custom colors set for them.)
  • Security options – this will print text including copy right information over the large photographs.

Click OK. Photoshop Elements will do the rest. You can now view your web gallery with any browser. You may wish to edit the photo captions and names.

Google
 

If you don't have Photoshop Elements, the next best thing is Picassa. Picassa is a great free program from Google.

| Home | Getting Started | Quick Fix | Images | Shapes | Text | Cropping | Vignettes |
| Animations | Print Layouts | Slide Show | Photo Gallery | Rollovers |
| Books | Web Sites | Classrom Ideas | Documentation | Buying a Digital Camera | About this Site |

These materials were created by Jim Wenzloff. You are welcome to reproduce them for educational purposes providing you include my name and the web address of the page. If you have any questions please contact .