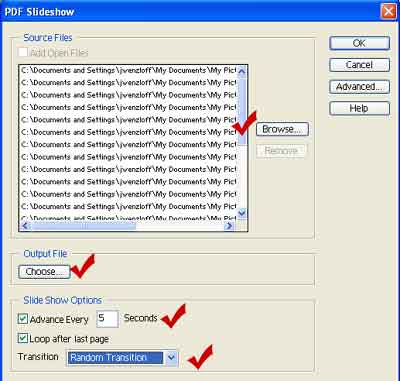
Creating a full Screen Slide Show

The full screen slide show can be used for a lot of purpose. You can send multiple pictures of your family of school in one file via e-mail or quickly create a slide show of a field trip. The other advantage is that it is created as a PDF file so anyone with Acrobat reader can view your files.


  1. Using the File Menu choose Automation/PDF Slideshow.
  2. Select the images for your slide show. You must select each image not a folder. If you have multiple images you want to select in one folder, hold down the Shift Key and click on each image.
  3. Choose the Output File. This is where you are going to save the file.
  4. Name the file.
  5. Set how many seconds you want each image to appear.
  6. If you want it to continue to loop choose the loop option.
  7. Lastly select the transition between pictures. Unfortunately, you can only have one transition for all of your images. You can choose Random Transitions which will give you variety.
  8. Click OK.
  9. Find your file on your computer, open it and view your slideshow.

Google
 

If you don't have Photoshop Elements, the next best thing is Picassa. Picassa is a great free program from Google.

| Home | Getting Started | Quick Fix | Images | Shapes | Text | Cropping | Vignettes |
| Animations | Print Layouts | Slide Show | Photo Gallery | Rollovers |
| Books | Web Sites | Classrom Ideas | Documentation | Buying a Digital Camera | About this Site |

These materials were created by Jim Wenzloff. You are welcome to reproduce them for educational purposes providing you include my name and the web address of the page. If you have any questions please contact .